Onetastic For Mac Office
What is Onetastic for OneNote?
Aug 21, 2019 OneNote, Microsoft's note application, has become a powerful productivity tool on its own, but you can also expand it with featured apps, extensions, services, and third-party tools called add-ins. Best of all, many of these are free.
Onetastic for OneNote is a multi-purpose add-in for Microsoft OneNote. It has been around for over five years (November 2011) and is extremely popular among Microsoft OneNote Power Users. It works with the OneNote desktop program (OneNote 2016, OneNote 2013, OneNote 2010). It does not work with the OneNote for Windows 10 App.
Onetastic was created by Omer Atay, a Microsoft Developer. Omer has been working for Microsoft for over a decade.
I met him briefly in person when I was in Redmond attending a Microsoft MVP Summit, and I think I freaked him out a bit as I had a bit of a fan girl moment. (When you meet the creator of a tool that has changed the way you organize your life, you may start babbling like an idiot yourself).
When it comes to recommendation add-ins, I’m pretty restrained in my suggestions. I feel comfortable recommending Onetastic because I use the tool every day.
Why Should I Care?
Onetastic gives you five free features:
- Image Crop and Rotate
- Select Text
- Favourites
- Pin to Desktop
- Custom Styles
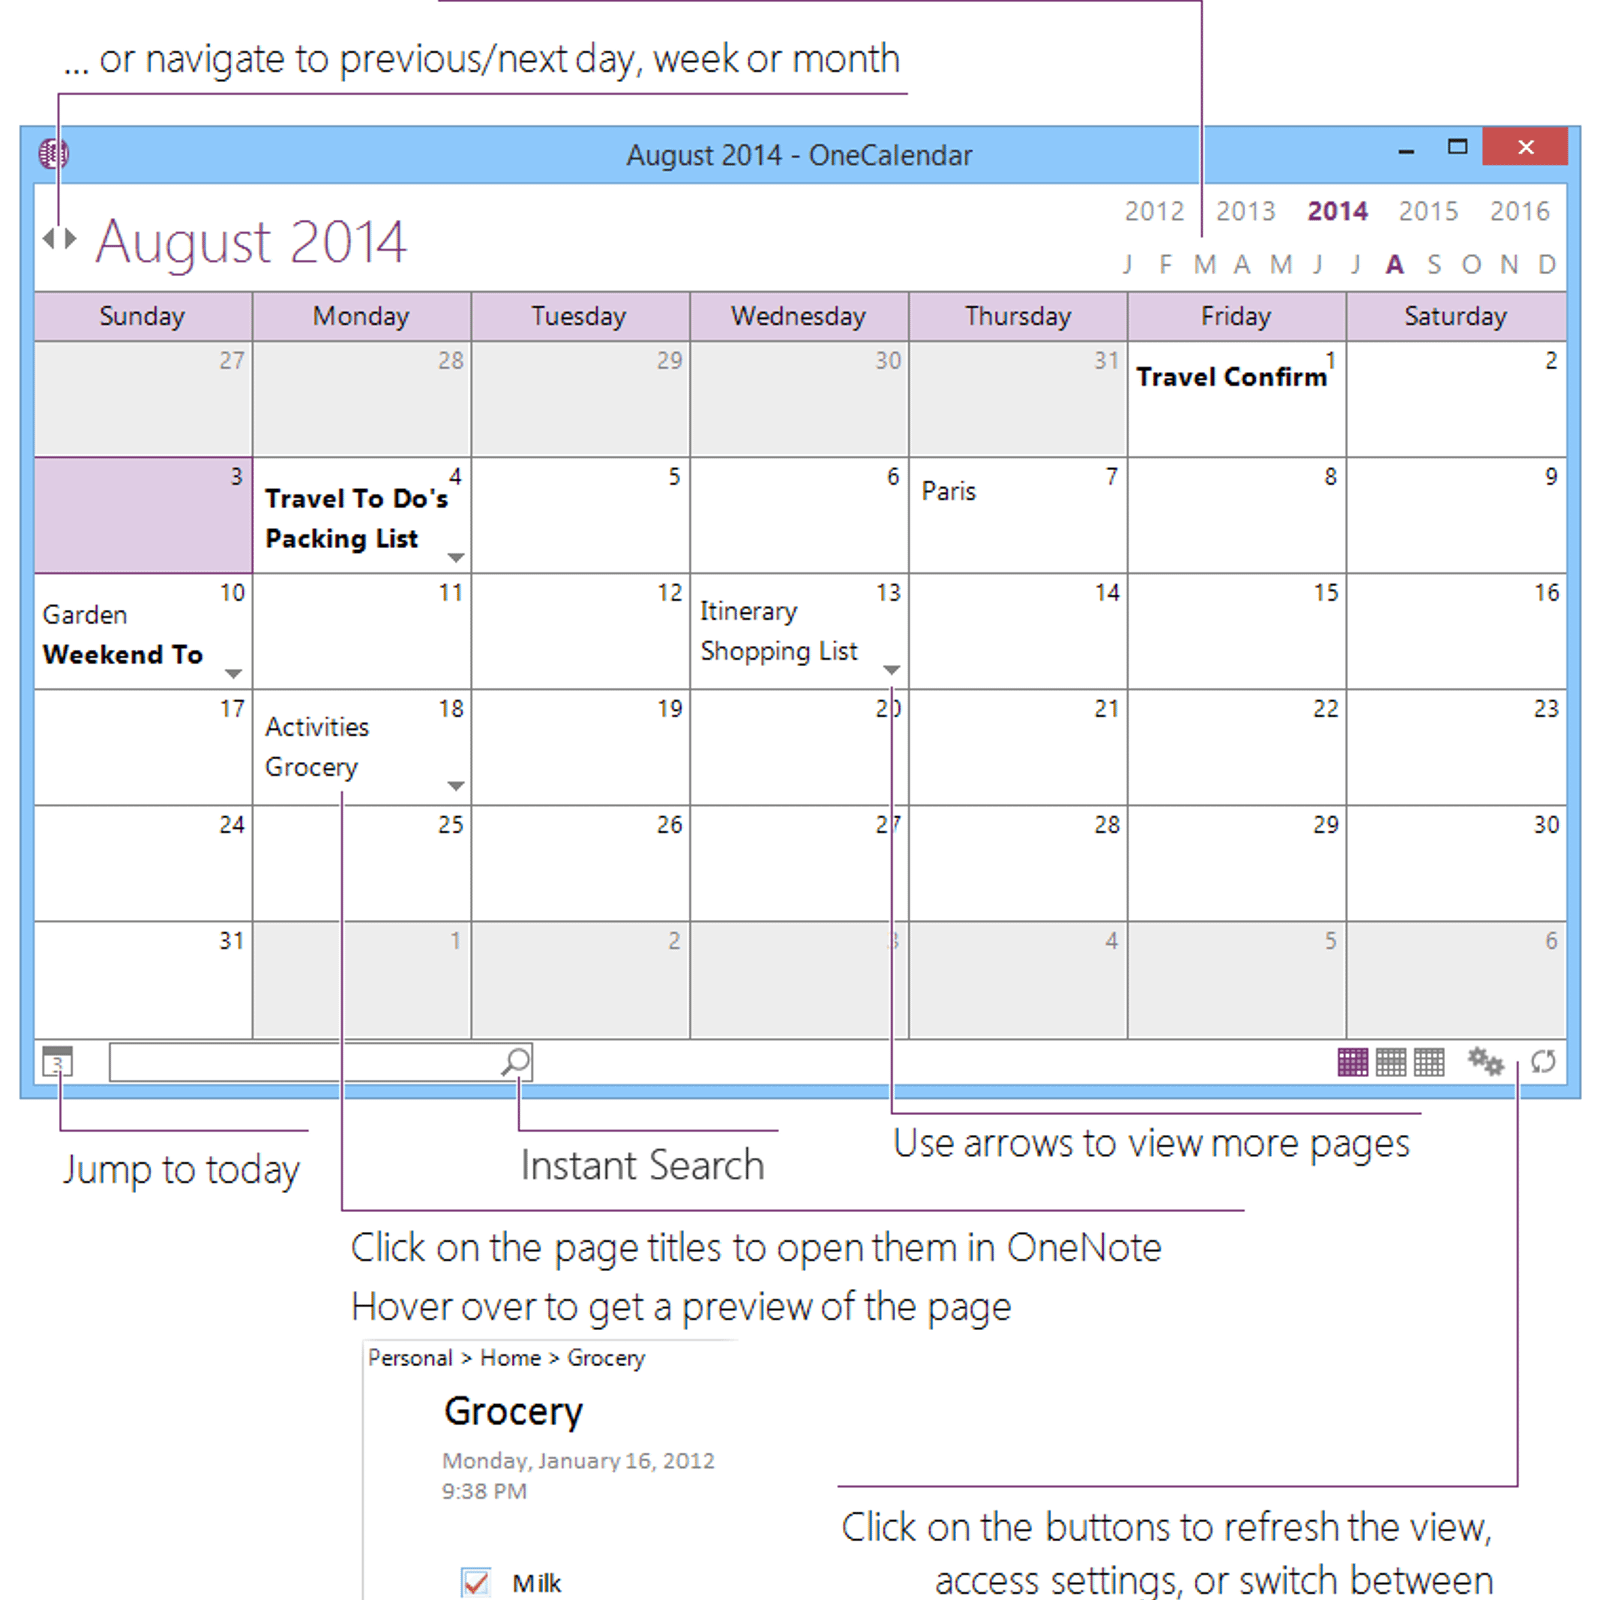
Onetastic also gives you access to OneCalendar – a standalone tool that provides a calendar view. (I’ll dive into how it works, the gotchas, and the use cases in another post).
There is also a Pro Account that you can pay for. By upgrading to the Pro Account, you can install hundreds of macros (available in Macroland) that you can use to add functionality to your OneNote experience. Unlocking the ability to use Macros was worth it for me because will save you so gosh darn much time you’ll straight up kick yourself when you realize how hard you were working before.
Here’s some of the Macros I installed and use every day:
But I Thought It was Free?
Yep. You probably heard Past Kelly at one of her past presentations say Onetastic was a free add-in. (Darn that Past Kelly, eh?) Well she wasn’t lying. It was free, back in ye old days of lore.
Onetastic is not 100% free anymore. There is now two tiers – a free tier and a paid Pro tier.
When I first found out, I went through a few of the stages of grief that sounded a bit like this: ‘”Nooo! WTF! Why?! Well, it’s not that expensive. Ok, I’m ready to pay. TAKE MY MONEY!'”
I tried to live without Onetastic for a while, after a reinstall of my software. It was several long months of cursing several times a day when I’d be reaching for a Onetastic button that I no longer had access to. Honestly, if the office had installed a Swear Jar, I’d have saved the money in a couple weeks to go buy the Paid Pro account.
In my world, OneNote is not just for personal use. OneNote is an essential business tool that I need in my business tool kit. The ROI is significant. In future posts, I’ll explain some of my Use Cases and the productivity benefits I’ve gained from using Macros with OneNote.
The Pro version of Onetastic(which you need to install macros) is now a one-time fee of $15. [Reminder to Canadian readers, we’re talking US$ so remember to factor in the current exchange rate.]
IMO it is a surprisingly cheap, one-time charge that unlocks so much functionality that he could totally charge a monthly SaaS subscription and people would pay… but he doesn’t. Which is very cool and for that I am thankful.
I recently acquired a website (http://onenote-tips.com/) from a very kind friend who is ready to pass on his legacy to someone else to manage and maintain the site. I am stoked for the opportunity, but now must acknowledge that I understand why people who provide a free service that gets popular and grows in scale would consider options to financially recover the annual cost of running the website (hosting, domain, storage, etc.) You can’t be mad at that!
Filezilla mac review. ^^ The information stated in this blog post is my own personal opinion and not a professional recommendation or official statement made by itgroove. Please ask your organizations’ IT Department or IT Consultant for permission before installing third party add-ins on your work machine or business device. If you attempt to hold me legally or morally responsible should your computer blows up or the internet breaks 0.01 seconds or 101 years after installing an add-in that I have discussed in my blog, I shall object to your claims and refer you back to this disclaimer.^^
Image Source:
Swear Jar – https://pando.com/2015/06/19/pandolands-digital-swear-jar-the-results-are-in/
Canadian Dollar Loonie US Dollar image – http://business.financialpost.com/investing/canadian-dollar-loonie-us-dollar

GIFs – sourced on GIPHY
-->In this article, you'll walk through the process of building a OneNote task pane add-in.
Prerequisites
Node.js (the latest LTS version)
The latest version of Yeoman and the Yeoman generator for Office Add-ins. To install these tools globally, run the following command via the command prompt:
Note
Even if you've previously installed the Yeoman generator, we recommend you update your package to the latest version from npm.
Create the add-in project
Run the following command to create an add-in project using the Yeoman generator:
Note
When you run the yo office command, you may receive prompts about the data collection policies of Yeoman and the Office Add-in CLI tools. Use the information that's provided to respond to the prompts as you see fit.
When prompted, provide the following information to create your add-in project:
- Choose a project type:
Office Add-in Task Pane project - Choose a script type:
Javascript - What do you want to name your add-in?
My Office Add-in - Which Office client application would you like to support?
OneNote
After you complete the wizard, the generator creates the project and installs supporting Node components.
Tip
You can ignore the next steps guidance that the Yeoman generator provides after the add-in project's been created. The step-by-step instructions within this article provide all of the guidance you'll need to complete this tutorial.
Explore the project
The add-in project that you've created with the Yeoman generator contains sample code for a very basic task pane add-in.
- The ./manifest.xml file in the root directory of the project defines the settings and capabilities of the add-in.
- The ./src/taskpane/taskpane.html file contains the HTML markup for the task pane.
- The ./src/taskpane/taskpane.css file contains the CSS that's applied to content in the task pane.
- The ./src/taskpane/taskpane.js file contains the Office JavaScript API code that facilitates interaction between the task pane and the Office host application.
Update the code
In your code editor, open the file ./src/taskpane/taskpane.js and add the following code within the run function. This code uses the OneNote JavaScript API to set the page title and add an outline to the body of the page.
Try it out
Navigate to the root folder of the project. Samsung scx4623f scan and fax manager download for mac.
Start the local web server and sideload your add-in.
Note
Office Add-ins should use HTTPS, not HTTP, even when you are developing. If you are prompted to install a certificate after you run one of the following commands, accept the prompt to install the certificate that the Yeoman generator provides.
Tip
If you're testing your add-in on Mac, run the following command before proceeding. When you run this command, the local web server starts.
Run the following command in the root directory of your project. When you run this command, the local web server will start (if it's not already running).
In OneNote on the web, open a notebook and create a new page.
Choose Insert > Office Add-ins to open the Office Add-ins dialog.
If you're signed in with your consumer account, select the MY ADD-INS tab, and then choose Upload My Add-in.
If you're signed in with your work or school account, select the MY ORGANIZATION tab, and then select Upload My Add-in.
The following image shows the MY ADD-INS tab for consumer notebooks.
In the Upload Add-in dialog, browse to manifest.xml in your project folder, and then choose Upload.
From the Home tab, choose the Show Taskpane button in the ribbon. The add-in task pane opens in an iFrame next to the OneNote page.
At the bottom of the task pane, choose the Run link to set the page title and add an outline to the body of the page.
Next steps
Congratulations, you've successfully created a OneNote task pane add-in! Next, learn more about the core concepts of building OneNote add-ins.